Most of the companies in our country --I think I'm not wrong if I say so-- are not fans of writing tests. I think they see it as a waste of time. At first, I saw it that way too, maybe I see it that way now, I'm not sure about that. Anyway, today I'll talk about how we write tests for our React application? Which tools do we use? What's the logic? If I need it, I might write the second part of this article. Let's not promise :) I wrote it, but let's do a simple example in this article. We'll do a more detailed example in the next article.
This article will be more useful if you understand what the words on the side mean and what they are used for. I won't define what Unit test, Jest, Enzyme do one by one, what they are and what they are not. I can't even talk about definitions like this. You can easily get information with a few searches for this. (I will leave a few sources for this at the bottom of the article.) Let's move on to the sample application.
First, let's think of a scenario
Let's use one input
One button
Let's save the text written to the input to a state and when we click the button, let's display the value in the state with console.log. For this, we will have a page like this.
Even if you are a beginner, it is a component that you can understand very easily. However, to explain; every text written to the input is kept in the state and when the button is clicked, the value in the state is written to console.log. Maybe this example will do the job for the first stage.
After creating a component like this, now it is time to write tests. Instead of giving all the codes at this stage, let me give it in parts and explain it over. Maybe it will be better understood this way. I will also share the project on github. You can examine it in more detail from there.
import React from "react";
import { render, fireEvent } from "@testing-library/react";
import SearchBox from "./SearchBox";
First, we include the necessary libraries in our file. SearchBox is the name I gave to the component.
import React from "react";
import { render, fireEvent } from "@testing-library/react";
import SearchBox from "./SearchBox";
First, we include the necessary libraries in our file. SearchBox is the name I gave to the component.
We have such a scope to check that our elements in the component are loaded correctly. Here, we send the SearchBox component in the render function and pull the container and queryByPlaceholderText from here.
container: It allows us to access all elements in the component. I used this because I wanted to access the element with the class name. Without using this, I could have accessed the element by writing an id value with queryAllByTestId.
queryByPlaceholderText: Since there is an input in the component, I access this input with the placeholder value.
In fact, in this scope, I called the button and input elements in the component and checked whether they were rendered.
I don't know what the exact function of jest.fn() is, but it is mentioned on the internet as a fake function.
As I mentioned above, we reached the elements in the component. Here, we sent requestClick as a prop to our component.
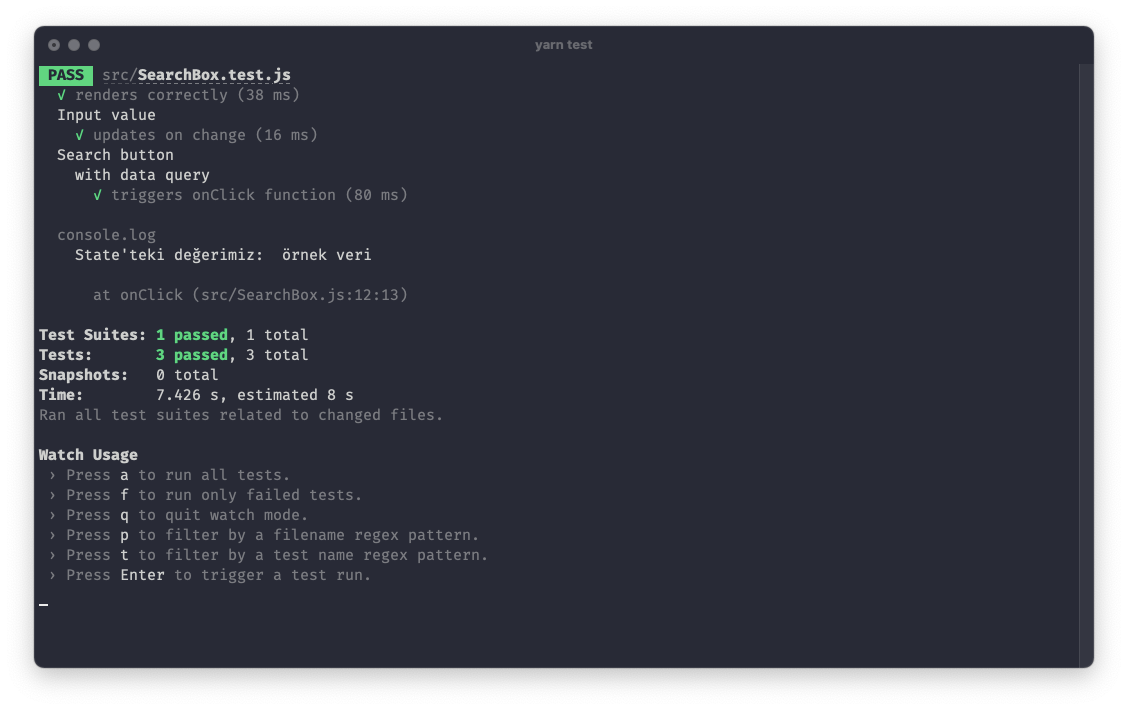
We create the click and change event with the fireEvent function that we previously included on the page. Here, we need to send a few parameters while creating the change event. One of them is checking which input's change event. The other is sending a sample data. The logic here is as follows; Normally, we have an event in the form of onChange={e => console.log(e.target.value)} to read the text we wrote to the input. Therefore, it will be necessary to send the data within the scope of the test in that way.
Then, we click the button with expect and see the data on our screen.
You can access the source codes from here. I will also continue to develop through this repo in the next series of the article.